Monday, December 24, 2012

Christmas is all about Second Chances

When I started this blog, it was just a way to showcase crafts, DIY projects and ideas that preferably gave an item a second chance.  Call it recycling if you'd like but I think "second chance" just sounds more positive.  Recycling implies it was trash whereas second chance means it had value and was renewed.  As I read Christmas stories to our kids and listen to the Christmas songs being sung, I can't help but think that Christmas is the ultimate example of second chances.  Afterall, the Bible says that man had messed up in the garden (think Adam and Eve) and we were in desparate need of a second chance (a Savior)!  Being separated from a holy God and living in a sinful fallen world, what could be more precious, more important, than a second chance?!

That is exactly why Jesus came to earth to be born as a baby--to give us a second chance.  He is God and left all his rights and privileges behind to come and be born in Bethlehem.  It was for you and for me.  It was for new life.  It was to some day grow up and take our place on a cross and die.  It was to give us a second chance at a relationship with God.

Just like any present we receive, it is not truly ours until we open the package.  In the same way, Jesus was God's gift to man to make a way for us to be reunited with Him.  John 3:16 says that He was born for ALL of us, "For God so loved the world, that He gave his one and only son, that whoever believes in Him shall not perish but have eternal life."  He was a gift to you.  A present for eternity.  Don't let it sit unopened.  Receive the gift and open it to a second chance this Christmas.

Wednesday, December 5, 2012

Nautical Desk Revealed: Craft Desk Makeover

[UPDATE:  This desk was sold to a Chester County, PA family as a gift for their two daughters who love the ocean and seashells.]

Last year at the height of Christmas shopping, I brought home a stray desk (for free, of course).  It has sat in my basement until this month.  For some reason, I thought the height of this holiday season would be a perfect time to tackle this project.  Really, I'm not sure what I was thinking on the timing, but it's finished and I love it!  This one is for me.  Finally, a project that is all mine.  And here's the results....

Before and After, ugly castoff desk in Dec. 2011 and now in Dec. 2012!
So how did it go from little girl 1960s desk to modern day nautical craft desk?  First, I sanded down the top to see if I had real wood underneath.  Unfortunately, it is solid wood, but there was a veneer on top.  So I had to ditch the staining idea like I did for my son's desk
Boo, veneer.
So onward I went to priming the desk and painting it white.  In the meantime, I had to remove the blue metal insert plates on the drawers, as well as the handles and decorative moulding.  Unlike moulding in the past that is screwed in with the handles, this one had tiny nails so it just needed a little prying off to reveal a flat-front drawer.
Finally, flat front drawers!
While the paint was drying, the handles got an overhaul with Kilz spray primer (already had it on hand) and white spray paint.  Normally, I love the opportunity to shop for new drawer pulls, but I wanted to preserve a little of the original desk and they were good heavy metal pull. Plus, it gives the desk a little feminity.
Spraypainting on an unusually warm December day
Next, came the fun/hard part.  I wanted to make this desk a nautical theme.  Nothing inspires me more than the beach and if this was to be a craft desk (a place of inspiration) then I needed some images of inspiration around me.  To see how I painted on the designs, refer to my previous blog (click here).  So here's the drawers, before and after!
BEFORE
AFTER
AFTER

AFTER
I can't wait to get the drawers filled with supplies and start creating. Maybe Santa will bring me some new craft organizers.
Side view with the nautical compass
And a beautiful nautilus right on top
One final view

Monday, December 3, 2012

Nautical Desk Sneak Peek: Transferring Images the Old Fashioned Way

My current project is finally for me!  This time, the desk is all mine.  I'll give you more details about that when it's completed.  For now, I want to give you a sneak peek at one of the nautical images that will be on the desk.  I do not own a fancy shmancy Silhouette Machine or a Cricut or any other time-saving, ridiculously over priced transfer tool.  Don't get me wrong, I'd love to own one, or win one from all the blogs doing giveaways.  But for now, I'll have to settle with the hands God gave me and a No.2 Pencil from Staples. 

Does anyone remember the "old-fashioned way" of transferring images?  Remember tracing paper?  Ok, so maybe I didn't go as far back to the days of tracing paper.  Here's a quick tutorial for those still waiting for Santa to bring the modern time-saving tools.

1.  Select the image you want to use.  Pick from a book, a clipart website, download and print from Google Images (which is where I got this nautical compass/star) or draw one yourself.


2.  Flip the image over and trace the reverse image on the back with a dark pencil (#2 or darker). 
The back of the paper after I've traced over it with pencil
 
3.  Flip the image back over and tape it to your project.  Then carefully retrace the image design.  The pencil underneath will be lightly transferred to your project. 
Tape and retrace on the original side
4.  Remove the paper and you'll see the pencil etchings.  Then choose your marker or paint to make the image darker.  I've used Sharpie markers in the past however this time I chose the DecoColor Paint Markers in Ultramarine Blue.  I love these because they glide on with the fullness of paint but with the steadiness of a pen. 

When finished, it looks like a hand-painted design!  After I finish the rest of the images, and seal the desk, I'll post the finished project.

Thursday, November 29, 2012

Desk Makeover in 48 hours

My latest freebie, a "hand-me-around"
In my family, we were big on hand-me-downs.  However, when us kids became adults and sizes could/can be shared, we began the phrases, "hand-me-ups" for going up in birth order, and "hand-me-arounds" for when they travel any direction in the family.  So when me neighbor was getting rid of a children's desk, I saw the perfect hand-me-around that could be used for my youngest son.  This once unfinished pine desk had been painted white with white knobs.  The paint was in need of some sprucing up.

Always preferring to showcase natural wood, I sanded down the top to reveal the original pine. Somewhere along the way, my new Dewalt sander (only used a few times since May) decided to quit on me. Yes, kaput, dead, no sanding! So I finished the top off by hand and hoped for the best, all while grumbling about this "awesome, contractor grade" sander I had purchased. In my frustration, I forgot to take a picture of the natural wood. 

Stained and Primed!
Moving on to the stain, I went the cheaper route and chose the Minwax Honey I already had from a dresser project. I also took the time-saver route with the primer and used Zinsser 123 Primer so I didn't have to worry about sanding or cleaning the white paint. Also had this left in storage. 

Imperfections show through, but I just call that wood character
My son agreed with me on an almond color paint and some black drawer pulls. And with that, we have a great desk updated for him to use for homework!


Alex's Finished Hand-Me-Around Desk!

Wednesday, November 14, 2012

Lighted Christmas Package

I can't take credit for the inspiration of this craft.  I saw it at a craft show several years ago and fell in love with it.  This was long before craft stores started carrying the blocks.  Being the thrift/crafty person I am, there was no way I was paying $25 at the craft show when I could go home and make one myself.  However, they didn't sell those little glass cubes...they were special order.  At least they used to be until Micheal's and ACMoore started carrying them year round!  So last year, I grabbed my 50% off coupon (never go there without a coupon!) and dug out my leftover ribbon and unused Christmas lights.  And voila.  I had myself that craft show piece for only $5!  This sits in the dining room where we eat Christmas dinner but it is also beautiful under the tree!
To make

Supplies
Christmas ribbon
strand of Christmas lights
Glass cube from a craft store with hole already in it

Assemble:
Put the Christmas lights inside the glass block and arrange so that when they light up, it looks balanced.  Tie the ribbon around the outside of the block so that it looks like a package being wrapped.  I tied mine just like a regular bow as if I was tying shoes to keep it simple.

Linked up at:
Beyond the Picket Fence

Thursday, October 25, 2012

Removing Stickers and Sticker Glue from Wood/Antiques

In front of me stood not only a gorgeous antique dresser, but the task of removing the Avery labels that were applied by a previous owner.  Someone obviously needed reminding of which drawers had their pants and shirts so labels were stuck to each drawer.  When I purchased the dresser, most of the drawers had the labels pulled off and the sticky residue was left behind.  Other drawers had the sticker paper still on. 

These labels needed to go!

Let's first start with what not to do to remove stickers from wood.  And when dealing with antiques, you need to be extra careful. 
1. Do NOT use nail polish remover.
2. Do NOT use an Exacto knife or any other knife to scrape it off.
3. Do NOT use Goo Gone or any other harsh remover.

Now that I've taken away your "old-standby" products, what's left? 
1.  Minwax Wood Cleaner:  According to a rep for Minwax, this can be applied with a cottonball.  Saturate the sticker and let sit a few hours. Then the sticker should wipe off.  Unfortunately, in my area, I could not find this product.  We only had the hardwood floor cleaner by Minwax and that didn't do the trick. 
2.  Howard Feed-n-Wax:  Since I already had this amazing product on hand, I decided to see if it could do the same as the Minwax cleaner.  I applied it with an old t-shirt to the drawers that were just glue (no sticker paper).  I didn't even need to let it sit.  It started to come right off.  So I alternated between the saturated cloth and a clean cloth until it came off.  As for the stickers with paper, I soaked them for a few hours and then gently worked on getting them off.  Carefully, I peeled them off with my fingers and then continued to saturate and rub off.
No more stickers!
In the end, the Howard Feed-n-Wax did not harm the wood, and there's no sign of there ever having been stickers except for one small area that was there from the previous owner trying to peel them away.  I'd love to hear if you have any other ideas that have worked for you.

Tuesday, October 16, 2012

Cushman Colonial Dresser: My Latest Bargain!

I get excited about old furniture.  I especially get pumped up about finding a piece for a bargain!  Yesterday, was my turn at a great deal.  I wandered into Goodwill to find a dresser for my youngest son.  The last dresser I found him, turned into a beautiful antique and I kept it for myself (click here for that dresser).  So, I went on the search for him again.  This time, I found a great dresser, but unfortunately, it will once again pass him by.  Not only is it too large for him, but it is a beautiful antique that my husband has decided to get in line for.  And Dad trumps son.

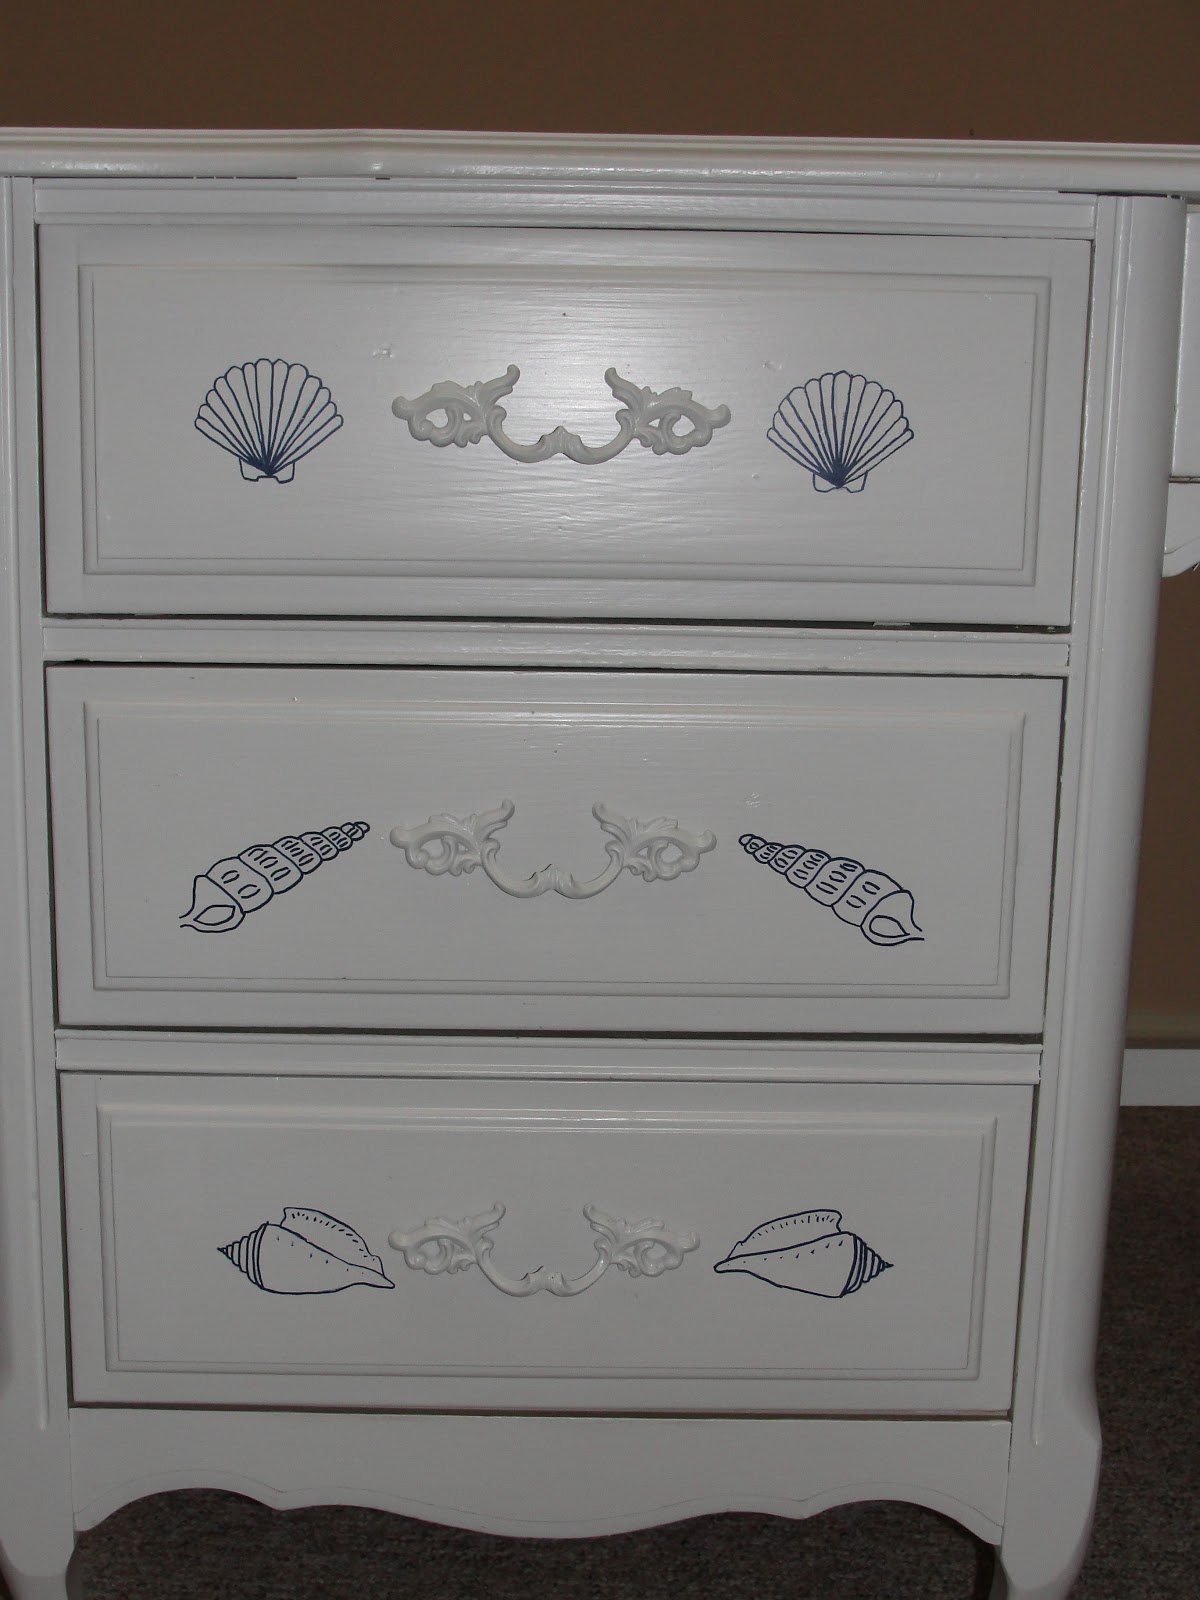
While I was ready to leave Goodwill empty-handed, I overheard someone say that a bunch of furniture was just dumped on the porch (instead of at the drop-off zone) and it was just sitting out there.  I bolted out the door and to my surprise, found a whole bedroom set!  Unfortunately, some other people beat me there and had already started claiming pieces.  It was a furniture frenzy!  I snagged the dresser before the employee even got the price gun.  When all was tagged, I walked off with this beauty for only $30!  Yes, that's a bargain!  The dresser is large, strong, really sturdy, and not a piece of wobbling or coming apart anywhere.

Better yet, when I got home, I looked up the company, Cushman Colonial Creations.  They produced furniture mainly from the 1930s-1050s and focused on using birch wood and solid craftsmanship.  The birch accounts for its sturdiness and the craftsmanship for how well it has held up.  Some of the Cushman pieces are quite valuable. 
"Pants" labels on stickers
So with that in mind, I had to wonder where this piece had been that it'd been reduced to a storage unit with stickers.  Really, did someone need to junk up the drawers to tell themselves what was in each drawer?  That's what we do to Ikea funiture (sorry Ikea) not antiques. 

So now it is in my hands.  The stickers will be removed, the stains will be assessed and this dresser has found a second chance at life, and a second home.
LOVE those drawer pulls!

Thursday, October 4, 2012

Lifesaver for Old Wood: Howard Feed-N-Wax

If your old furniture needs a second chance at shine, or the scuffs from years gone by are making it look old, do I have the product for you!  A friend of mine just introduced me to this best kept secret on the top shelf at Home Depot.  It seems simple, beeswax & orange oil.  The smell is yummy.  For the wood, it's a new lease on life.  I wish I had taken a before picture of the antique table that holds our bowl of keys.  Over the years the keys have often missed the bowl while being dropped leaving many scratches on the table.  I was thinking about sanding down the top and restaining it.  Then along comes Feed-N-Wax.  I applied it and the table looks brand new!

I'm now going nuts through the house applying it to knicks and scratches, to old wood needing conditioning, and even on squeeky drawers.  Just a swab of this stuff on the drawer bottoms and they slide beautifully again! 

The directions are simple (taken right from the bottle):
1.  Saturate a small pad of cloth and wipe on.
2.  Let stand at least 20 minutes and wipe off excess.
3.  Polish out with a clean cloth.

Saturday, September 29, 2012

Kid Night Table redo

When my oldest son got his dresser and night table repainted, my youngest wanted to have his done as well.  This was not a fancy night table. I had gotten it for free awhile back and chose it for it's slim frame.  We needed a really small table to fit between his bed and the wall--something just to hold a clock and some books on the bottom.  This country-style table was just the right size for a second chance in our house.  Although country is not the theme of their room, the size was perfect. 
BEFORE
My youngest is very into bright shiny colors so when I asked him his choice of colors to paint the table, I was surprised he chose somewhat tastefully.  The brown he picked was to match his brother's dresser top.  And the cranberry was because he liked it and it matched a cranberry color in his quilt.  Best yet, both paint colors were already in the house.  So this was one of those completely free projects.  The best kind! 
AFTER

Friday, September 21, 2012

Antique Dresser Reveal: Mahogony

Free dresser BEFORE shot, one knob was broken
Oh, if drawers could talk!  I recently came upon this 1920s dresser for free and couldn't wait to get to sanding and see what was underneath.  The current state of it made us laugh and say, "I wonder what this grandma did during Prohibition.  Just look at all the wine glass marks!" 
There were too many water stains to count!
Nothing gets me more excited than restoring an antique piece of furniture to its original glory.  Painting furniture is a last resort when it comes to real wood.  If it's veneer or chipped up, bring on the paint.  However, if there's solid wood, it's begging to show itself off.  Some sanding and new stain can transform a piece.  Just look at this one.  Look at that grain showing through just from a little sanding!
Sanded down to show off it's grain
When it came to stain, I thought about going light and picked "Honey".  However, the wood soaked it up and turned it into its own beautiful color.  Here's the finished piece.
Who would have thought that beauty was in there?!
And where the water stains used to be is now a gorgeous top.  Just look at the wood grain on top now!
The top of the dresser
So the kids kept asking me who this dresser would be for and I answered, of course, "for me!"  I'm not sharing this beauty.  One last side by side look.


BEFORE
AFTER


Wednesday, August 29, 2012

Free Dining room chairs reupholstered

Dumpster Diving....Curb Alert....Bulk Trash....
All these terms might make some ashamed, but for others, it's a chance to get free stuff.  In this case, my "new" free chairs fell under the heading of Curb Alert.  An ad was placed for a curb alert for some items near me.  By the time I got there, the items I was after were already taken but there were dining room chairs in desparate need of a second chance.  They were very dirty and the seats were covered in pet hair, but I saw the potential.  So into the back of my SUV they went for a second chance at usefulness.  Afterall, they couldn't be worse than the spare folding chairs we would pull out at the holidays to make seating for the extra people.

My husband has learned to see the potential in the stray furniture I bring home.  Or at least he pretends to see, trusting that I can see it even if he can't.  So here's the before pictures. 
Nice black iron and wood for a sturdy chair
Ewwww!  There was so much pet hair that the elephant pattern was barely visible.
Once the seat was removed, I got a bucket of cleaner and hosed down the chair.  After that was cleaned, I moved on to the task of removing the old fabric and cushioning.  Normally, I would save the foam if the chair had been ours, but who knows what lurked inside this foam. 
After all was removed from the wood board, I added new high density foam (40% off from JoAnn's) and the batting (also 40% off from JoAnn's) with spray adhesive and a staple gun.  Once ready for the fabric, I picked new upholstery fabric that was also 50% off.  Gotta love sales!  Here's the finished chair and seat.  The two new chairs will go at the heads of the table.
 

Monday, August 20, 2012

DIY Deck Makeover/Redo

This Summer we're celebrating 9 years in our house.  Over the years, we've made several changes to the house as well as the backyard.  However, nothing has undergone more "touchups" and "redos" than our backyard deck.  In an attempt to modernize it and make it more appealing, we've tried several steps along the way.  Finally, this past Spring, the deck was looking so drab that we thought about ripping the whole thing out and laying stone on top of the concrete slab underneath.  It was very tempting until it was pointed out to us how much a pergola costs and how everything was still structurally sound.  So back to the drawing board we went.   Here's a picture of the deck from 2003.
Over the years, we yanked out the wrap-around benches, added a privacy screen to hide the heat pump, and tried several shades of stain.  Meanwhile, those tiny black-eyed susans grew to overtake the bed.  The only thing stopping them were the daylillies anchoring the corners that filled in even more.  It was a jungle and a half! 

So my husband added a box step (which you can click here to see step-by-step instructions in my other blog).  And I ripped out the ugly wood edging to replace it with brick (which you can see here in my other blog).  The final step was to get the old wood powerwashed and stained.  And TA-DA!  Here's the deck today!

Here's some other angles.


And on a sunnier day


And with that, we're finally finished trying to "fix" the deck. 

Friday, August 17, 2012

Reusing Old Christmas Cards

a sample of cards
If you're anything like me, piles of craft supplies and half-finished projects multiply during the off-season.  The off-season, as I like to call it, is Summer.  This is the time of year when the kids are off from school and it's almost impossible to do a project.  Sadly, the pile containing the Christmas cards had sat long before school ever let out in June.  Truthfully, they got buried and forgotten.  The good news is, if you're like me, this is the perfect time to dig out those cards and reuse them!  Who wants to be making cards in the middle of December during the height of shopping and entertaining?

Along with cutting them into gifttags, you can also make them into this year's Christmas cards!  It was at this time last year that I found a bulk pack of blank green cards with envelopes at 80% off.  Afterall, who's buying Christmas stuff in August?  The project is simple.  If it had a rating, it would be marked "super beginner". 

Just cut off the front of the card in it's entirety, or just the portion of the picture you want.  Then tape, glue, sticky-dot, or however you want to adhere it to the front of the new blank card.  You can proceed to stamp or handwrite "Merry Christmas" inside the card.  However, I like to leave them blank.  This way they can be used as thank you cards for teachers or general holiday cards for others.  Don't throw those cards out.  There's a second chance for them to bless again.