When I started this blog, it was just a way to showcase crafts, DIY projects and ideas that preferably gave an item a second chance. Call it recycling if you'd like but I think "second chance" just sounds more positive. Recycling implies it was trash whereas second chance means it had value and was renewed. As I read Christmas stories to our kids and listen to the Christmas songs being sung, I can't help but think that Christmas is the ultimate example of second chances. Afterall, the Bible says that man had messed up in the garden (think Adam and Eve) and we were in desparate need of a second chance (a Savior)! Being separated from a holy God and living in a sinful fallen world, what could be more precious, more important, than a second chance?!
That is exactly why Jesus came to earth to be born as a baby--to give us a second chance. He is God and left all his rights and privileges behind to come and be born in Bethlehem. It was for you and for me. It was for new life. It was to some day grow up and take our place on a cross and die. It was to give us a second chance at a relationship with God.
Just like any present we receive, it is not truly ours until we open the package. In the same way, Jesus was God's gift to man to make a way for us to be reunited with Him. John 3:16 says that He was born for ALL of us, "For God so loved the world, that He gave his one and only son, that whoever believes in Him shall not perish but have eternal life." He was a gift to you. A present for eternity. Don't let it sit unopened. Receive the gift and open it to a second chance this Christmas.
Monday, December 24, 2012
Wednesday, December 5, 2012
Nautical Desk Revealed: Craft Desk Makeover
[UPDATE: This desk was sold to a Chester County, PA family as a gift for their two daughters who love the ocean and seashells.]
Last year at the height of Christmas shopping, I brought home a stray desk (for free, of course). It has sat in my basement until this month. For some reason, I thought the height of this holiday season would be a perfect time to tackle this project. Really, I'm not sure what I was thinking on the timing, but it's finished and I love it! This one is for me. Finally, a project that is all mine. And here's the results....
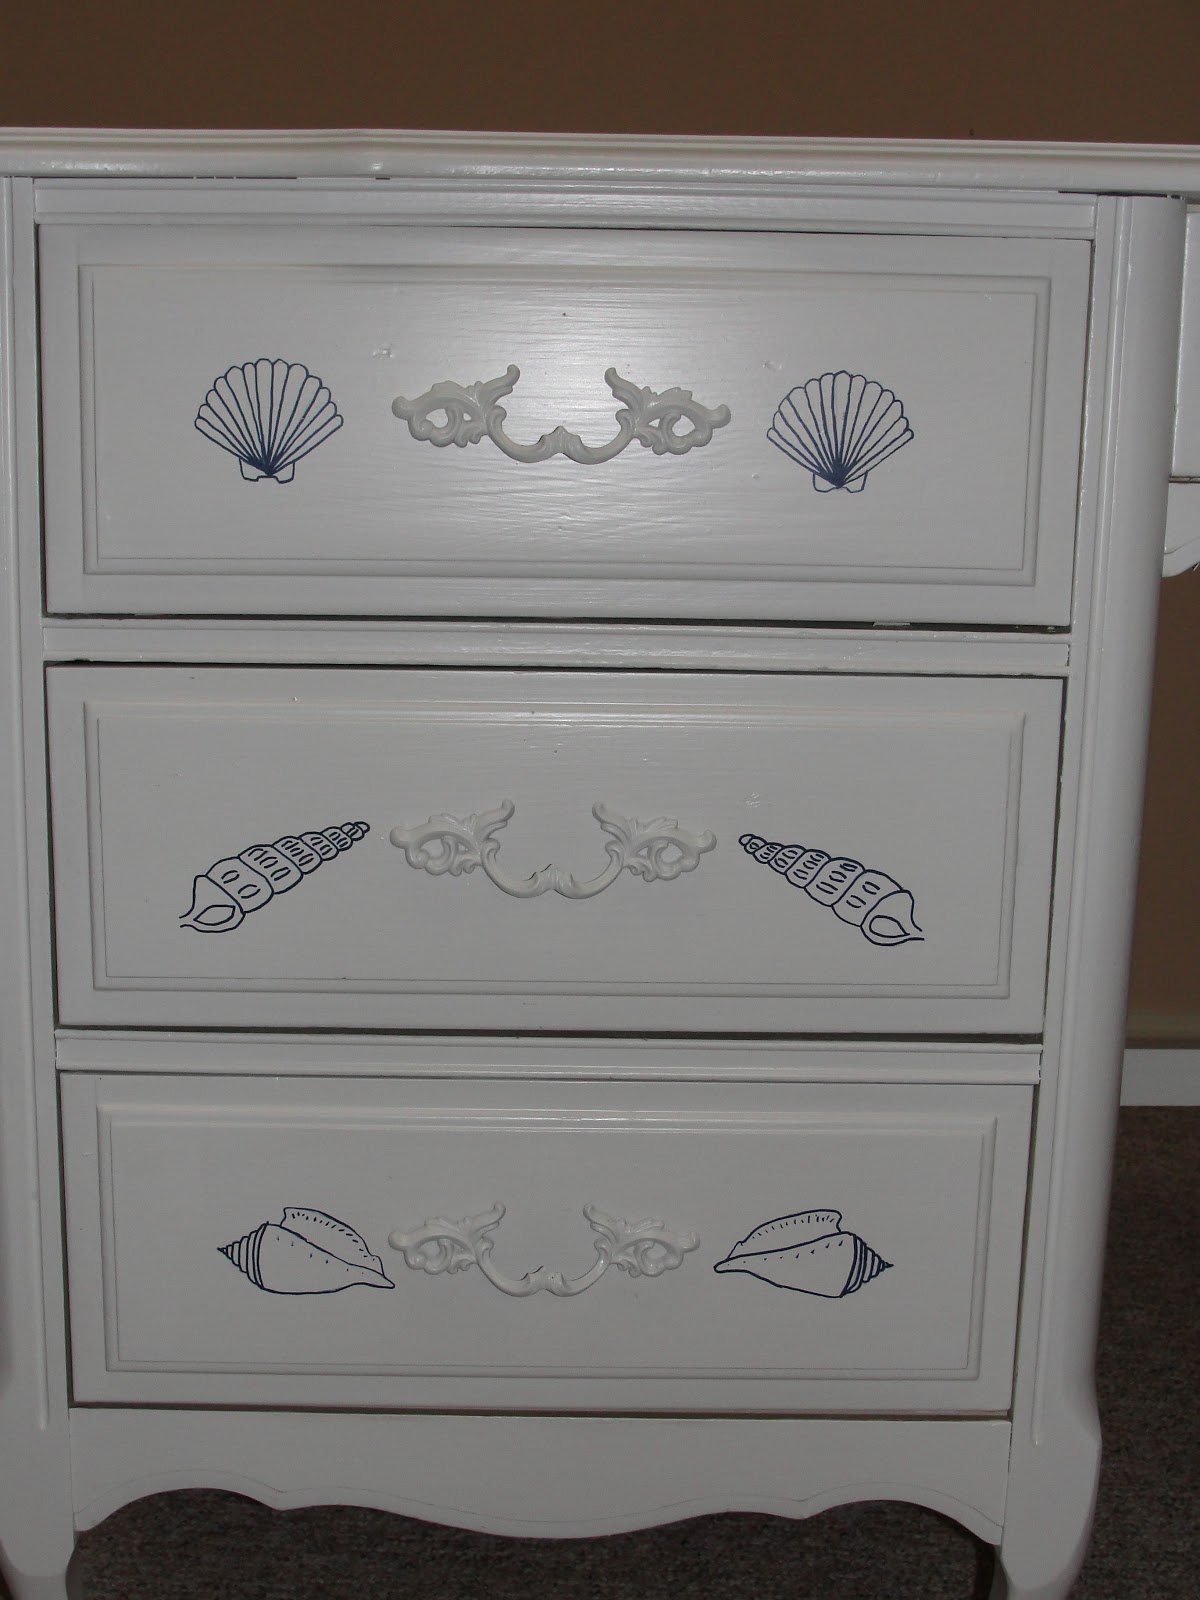
So how did it go from little girl 1960s desk to modern day nautical craft desk? First, I sanded down the top to see if I had real wood underneath. Unfortunately, it is solid wood, but there was a veneer on top. So I had to ditch the staining idea like I did for my son's desk.
So onward I went to priming the desk and painting it white. In the meantime, I had to remove the blue metal insert plates on the drawers, as well as the handles and decorative moulding. Unlike moulding in the past that is screwed in with the handles, this one had tiny nails so it just needed a little prying off to reveal a flat-front drawer.
While the paint was drying, the handles got an overhaul with Kilz spray primer (already had it on hand) and white spray paint. Normally, I love the opportunity to shop for new drawer pulls, but I wanted to preserve a little of the original desk and they were good heavy metal pull. Plus, it gives the desk a little feminity.
Next, came the fun/hard part. I wanted to make this desk a nautical theme. Nothing inspires me more than the beach and if this was to be a craft desk (a place of inspiration) then I needed some images of inspiration around me. To see how I painted on the designs, refer to my previous blog (click here). So here's the drawers, before and after!
I can't wait to get the drawers filled with supplies and start creating. Maybe Santa will bring me some new craft organizers.
Last year at the height of Christmas shopping, I brought home a stray desk (for free, of course). It has sat in my basement until this month. For some reason, I thought the height of this holiday season would be a perfect time to tackle this project. Really, I'm not sure what I was thinking on the timing, but it's finished and I love it! This one is for me. Finally, a project that is all mine. And here's the results....
![]() |
| Before and After, ugly castoff desk in Dec. 2011 and now in Dec. 2012! |
| Boo, veneer. |
| Finally, flat front drawers! |
| Spraypainting on an unusually warm December day |
| BEFORE |
| AFTER |
| AFTER |
| AFTER |
| Side view with the nautical compass |
| And a beautiful nautilus right on top |
| One final view |
Monday, December 3, 2012
Nautical Desk Sneak Peek: Transferring Images the Old Fashioned Way
My current project is finally for me! This time, the desk is all mine. I'll give you more details about that when it's completed. For now, I want to give you a sneak peek at one of the nautical images that will be on the desk. I do not own a fancy shmancy Silhouette Machine or a Cricut or any other time-saving, ridiculously over priced transfer tool. Don't get me wrong, I'd love to own one, or win one from all the blogs doing giveaways. But for now, I'll have to settle with the hands God gave me and a No.2 Pencil from Staples.
Does anyone remember the "old-fashioned way" of transferring images? Remember tracing paper? Ok, so maybe I didn't go as far back to the days of tracing paper. Here's a quick tutorial for those still waiting for Santa to bring the modern time-saving tools.
1. Select the image you want to use. Pick from a book, a clipart website, download and print from Google Images (which is where I got this nautical compass/star) or draw one yourself.
2. Flip the image over and trace the reverse image on the back with a dark pencil (#2 or darker).
3. Flip the image back over and tape it to your project. Then carefully retrace the image design. The pencil underneath will be lightly transferred to your project.
4. Remove the paper and you'll see the pencil etchings. Then choose your marker or paint to make the image darker. I've used Sharpie markers in the past however this time I chose the DecoColor Paint Markers in Ultramarine Blue. I love these because they glide on with the fullness of paint but with the steadiness of a pen.
When finished, it looks like a hand-painted design! After I finish the rest of the images, and seal the desk, I'll post the finished project.
Does anyone remember the "old-fashioned way" of transferring images? Remember tracing paper? Ok, so maybe I didn't go as far back to the days of tracing paper. Here's a quick tutorial for those still waiting for Santa to bring the modern time-saving tools.
1. Select the image you want to use. Pick from a book, a clipart website, download and print from Google Images (which is where I got this nautical compass/star) or draw one yourself.
2. Flip the image over and trace the reverse image on the back with a dark pencil (#2 or darker).
| The back of the paper after I've traced over it with pencil |
| Tape and retrace on the original side |
When finished, it looks like a hand-painted design! After I finish the rest of the images, and seal the desk, I'll post the finished project.
Thursday, November 29, 2012
Desk Makeover in 48 hours
| My latest freebie, a "hand-me-around" |
Always preferring to showcase natural wood, I sanded down the top to reveal the original pine. Somewhere along the way, my new Dewalt sander (only used a few times since May) decided to quit on me. Yes, kaput, dead, no sanding! So I finished the top off by hand and hoped for the best, all while grumbling about this "awesome, contractor grade" sander I had purchased. In my frustration, I forgot to take a picture of the natural wood.
| Stained and Primed! |
| Imperfections show through, but I just call that wood character |
| Alex's Finished Hand-Me-Around Desk! |
Wednesday, November 14, 2012
Lighted Christmas Package
I can't take credit for the inspiration of this craft. I saw it at a craft show several years ago and fell in love with it. This was long before craft stores started carrying the blocks. Being the thrift/crafty person I am, there was no way I was paying $25 at the craft show when I could go home and make one myself. However, they didn't sell those little glass cubes...they were special order. At least they used to be until Micheal's and ACMoore started carrying them year round! So last year, I grabbed my 50% off coupon (never go there without a coupon!) and dug out my leftover ribbon and unused Christmas lights. And voila. I had myself that craft show piece for only $5! This sits in the dining room where we eat Christmas dinner but it is also beautiful under the tree!
To make
Supplies:
Christmas ribbon
strand of Christmas lights
Glass cube from a craft store with hole already in it
Assemble:
Put the Christmas lights inside the glass block and arrange so that when they light up, it looks balanced. Tie the ribbon around the outside of the block so that it looks like a package being wrapped. I tied mine just like a regular bow as if I was tying shoes to keep it simple.
Linked up at:
To make
Supplies:
Christmas ribbon
strand of Christmas lights
Glass cube from a craft store with hole already in it
Assemble:
Put the Christmas lights inside the glass block and arrange so that when they light up, it looks balanced. Tie the ribbon around the outside of the block so that it looks like a package being wrapped. I tied mine just like a regular bow as if I was tying shoes to keep it simple.
Linked up at:
![]() |
| Beyond the Picket Fence |
Thursday, October 25, 2012
Removing Stickers and Sticker Glue from Wood/Antiques
In front of me stood not only a gorgeous antique dresser, but the task of removing the Avery labels that were applied by a previous owner. Someone obviously needed reminding of which drawers had their pants and shirts so labels were stuck to each drawer. When I purchased the dresser, most of the drawers had the labels pulled off and the sticky residue was left behind. Other drawers had the sticker paper still on.
Let's first start with what not to do to remove stickers from wood. And when dealing with antiques, you need to be extra careful.
1. Do NOT use nail polish remover.
2. Do NOT use an Exacto knife or any other knife to scrape it off.
3. Do NOT use Goo Gone or any other harsh remover.
Now that I've taken away your "old-standby" products, what's left?
1. Minwax Wood Cleaner: According to a rep for Minwax, this can be applied with a cottonball. Saturate the sticker and let sit a few hours. Then the sticker should wipe off. Unfortunately, in my area, I could not find this product. We only had the hardwood floor cleaner by Minwax and that didn't do the trick.
2. Howard Feed-n-Wax: Since I already had this amazing product on hand, I decided to see if it could do the same as the Minwax cleaner. I applied it with an old t-shirt to the drawers that were just glue (no sticker paper). I didn't even need to let it sit. It started to come right off. So I alternated between the saturated cloth and a clean cloth until it came off. As for the stickers with paper, I soaked them for a few hours and then gently worked on getting them off. Carefully, I peeled them off with my fingers and then continued to saturate and rub off.
In the end, the Howard Feed-n-Wax did not harm the wood, and there's no sign of there ever having been stickers except for one small area that was there from the previous owner trying to peel them away. I'd love to hear if you have any other ideas that have worked for you.
| These labels needed to go! |
Let's first start with what not to do to remove stickers from wood. And when dealing with antiques, you need to be extra careful.
1. Do NOT use nail polish remover.
2. Do NOT use an Exacto knife or any other knife to scrape it off.
3. Do NOT use Goo Gone or any other harsh remover.
Now that I've taken away your "old-standby" products, what's left?
1. Minwax Wood Cleaner: According to a rep for Minwax, this can be applied with a cottonball. Saturate the sticker and let sit a few hours. Then the sticker should wipe off. Unfortunately, in my area, I could not find this product. We only had the hardwood floor cleaner by Minwax and that didn't do the trick.
2. Howard Feed-n-Wax: Since I already had this amazing product on hand, I decided to see if it could do the same as the Minwax cleaner. I applied it with an old t-shirt to the drawers that were just glue (no sticker paper). I didn't even need to let it sit. It started to come right off. So I alternated between the saturated cloth and a clean cloth until it came off. As for the stickers with paper, I soaked them for a few hours and then gently worked on getting them off. Carefully, I peeled them off with my fingers and then continued to saturate and rub off.
| No more stickers! |
Tuesday, October 16, 2012
Cushman Colonial Dresser: My Latest Bargain!
I get excited about old furniture. I especially get pumped up about finding a piece for a bargain! Yesterday, was my turn at a great deal. I wandered into Goodwill to find a dresser for my youngest son. The last dresser I found him, turned into a beautiful antique and I kept it for myself (click here for that dresser). So, I went on the search for him again. This time, I found a great dresser, but unfortunately, it will once again pass him by. Not only is it too large for him, but it is a beautiful antique that my husband has decided to get in line for. And Dad trumps son.
While I was ready to leave Goodwill empty-handed, I overheard someone say that a bunch of furniture was just dumped on the porch (instead of at the drop-off zone) and it was just sitting out there. I bolted out the door and to my surprise, found a whole bedroom set! Unfortunately, some other people beat me there and had already started claiming pieces. It was a furniture frenzy! I snagged the dresser before the employee even got the price gun. When all was tagged, I walked off with this beauty for only $30! Yes, that's a bargain! The dresser is large, strong, really sturdy, and not a piece of wobbling or coming apart anywhere.
Better yet, when I got home, I looked up the company, Cushman Colonial Creations. They produced furniture mainly from the 1930s-1050s and focused on using birch wood and solid craftsmanship. The birch accounts for its sturdiness and the craftsmanship for how well it has held up. Some of the Cushman pieces are quite valuable.
So with that in mind, I had to wonder where this piece had been that it'd been reduced to a storage unit with stickers. Really, did someone need to junk up the drawers to tell themselves what was in each drawer? That's what we do to Ikea funiture (sorry Ikea) not antiques.
So now it is in my hands. The stickers will be removed, the stains will be assessed and this dresser has found a second chance at life, and a second home.
While I was ready to leave Goodwill empty-handed, I overheard someone say that a bunch of furniture was just dumped on the porch (instead of at the drop-off zone) and it was just sitting out there. I bolted out the door and to my surprise, found a whole bedroom set! Unfortunately, some other people beat me there and had already started claiming pieces. It was a furniture frenzy! I snagged the dresser before the employee even got the price gun. When all was tagged, I walked off with this beauty for only $30! Yes, that's a bargain! The dresser is large, strong, really sturdy, and not a piece of wobbling or coming apart anywhere.
Better yet, when I got home, I looked up the company, Cushman Colonial Creations. They produced furniture mainly from the 1930s-1050s and focused on using birch wood and solid craftsmanship. The birch accounts for its sturdiness and the craftsmanship for how well it has held up. Some of the Cushman pieces are quite valuable.
| "Pants" labels on stickers |
So now it is in my hands. The stickers will be removed, the stains will be assessed and this dresser has found a second chance at life, and a second home.
| LOVE those drawer pulls! |
Subscribe to:
Posts (Atom)