Thursday, October 22, 2015

Sun Lover's End Table

Before and After
Awhile back I saw a tutorial on using contact paper to stain around a design.  I waited for the right furniture piece to be castoff to practice on.  When I stumbled upon this light colored end table, I knew it was my practice piece. 

I started by sanding down the top and choosing my design....a sun to hang on to summer a little longer.  After cutting the sun out of contact paper and laying it down, I first put down the MinWax  Pre-Stain Wood Conditioner.  Next, I used a cloth to apply the MinWax Wood Finish stain in "Red Oak".   Once dried, I removed the contact paper to find the sun design. 

The table received 3 coats of Polycrylic to the top and "Sarsapairlla" color to the bottom (also with Polycrylic).  The end result is a table to make summer last well into the winter!


Monday, October 19, 2015

Salvaged Desk: from Curbside to Charming

Before & After
There's nothing better than saving furniture from a landfill and turning it into something more charming than imagined.  That's what happened to this desk that was saved curbside.  Upon getting it out of the car, I quickly realized that it was discarded for it's black mold, not it's age.  The bottom 4 inches were caked in black mold and water damage.  After several unsuccessful attempts to remove it, my wonderful husband and I realized that the moldy molding could be removed!  Off it went...
Remove a few screws, give it a good hit with a sledgehammer and it was off!
As for the rest of the desk, it was in perfect condition, minus a few knicks and a "'67" carved on a drawer front.  With the bottom molding removed, there was now the issue of how to raise the desk back up.  Drawing on my endless supply of freebies (the desk was free too!), I found some wooden table legs I cut down to size. 

New legs and new trim were added along the bottom
 Due to the new wood added, and the older veneer, I chose to paint the bottom of the desk and only stain the top.  It's a new modern beauty!


Sunday, October 18, 2015

Easy Coffee Table Restoration (with Howard Restor-A-Finish)


Sometimes furniture is solid but on the less-than-pretty side.  I had been wanting to try Howard Restor-A-Finish but wanted an old "junker" to try it on.  So along came this FREE coffee table.  It was solid wood and ugly.  It was definitely in need of restoring!  This was the perfect guinea pig for my trial run with this product. 

To say I was pleasantly surprised is an understatement!  It was fast, easy, and came with phenominal results!!  Just look at the before and after!

BEFORE


AFTER
It covered over all the scratches, blemishes, and water spots from glasses long ago.  The only thing it didn't remove was the dark circle stain near the center.  Look at that grain restored!
There are a few "rules" for using the Restor-A-Finish.  First, there can't be any kind of a seal on the wood.  This table's finish was long gone....if it ever had one. So the wood was able to soak in the finish.  Also, a seal afterwards is not an option.  Third, to clean/dust it in the future, use Howards Beeswax.  It's my go-to cleaner for solid wood these days. 

For an instructional video, click below. 

Monday, August 24, 2015

19th Century Empire Dresser

Empire dresser, circa 1870s
When I found this gem for FREE, from a man who no longer had room for it, I knew I found a piece of history.  He was an older gentleman and said it had been his parents' dresser but didn't know the extended history.  After doing some research, and consulting on the piece, it was believed to have been from the 1870s.  Oh, how I love stumbling on a beauty!

Considering it's age, there really wasn't much to be fixed except two missing drawer knobs and a crack in the top that had already been stabilized.  Otherwise, it just needed a good oil rubdown and some touchups.

First, let me give you some reasons why it was worth saving.
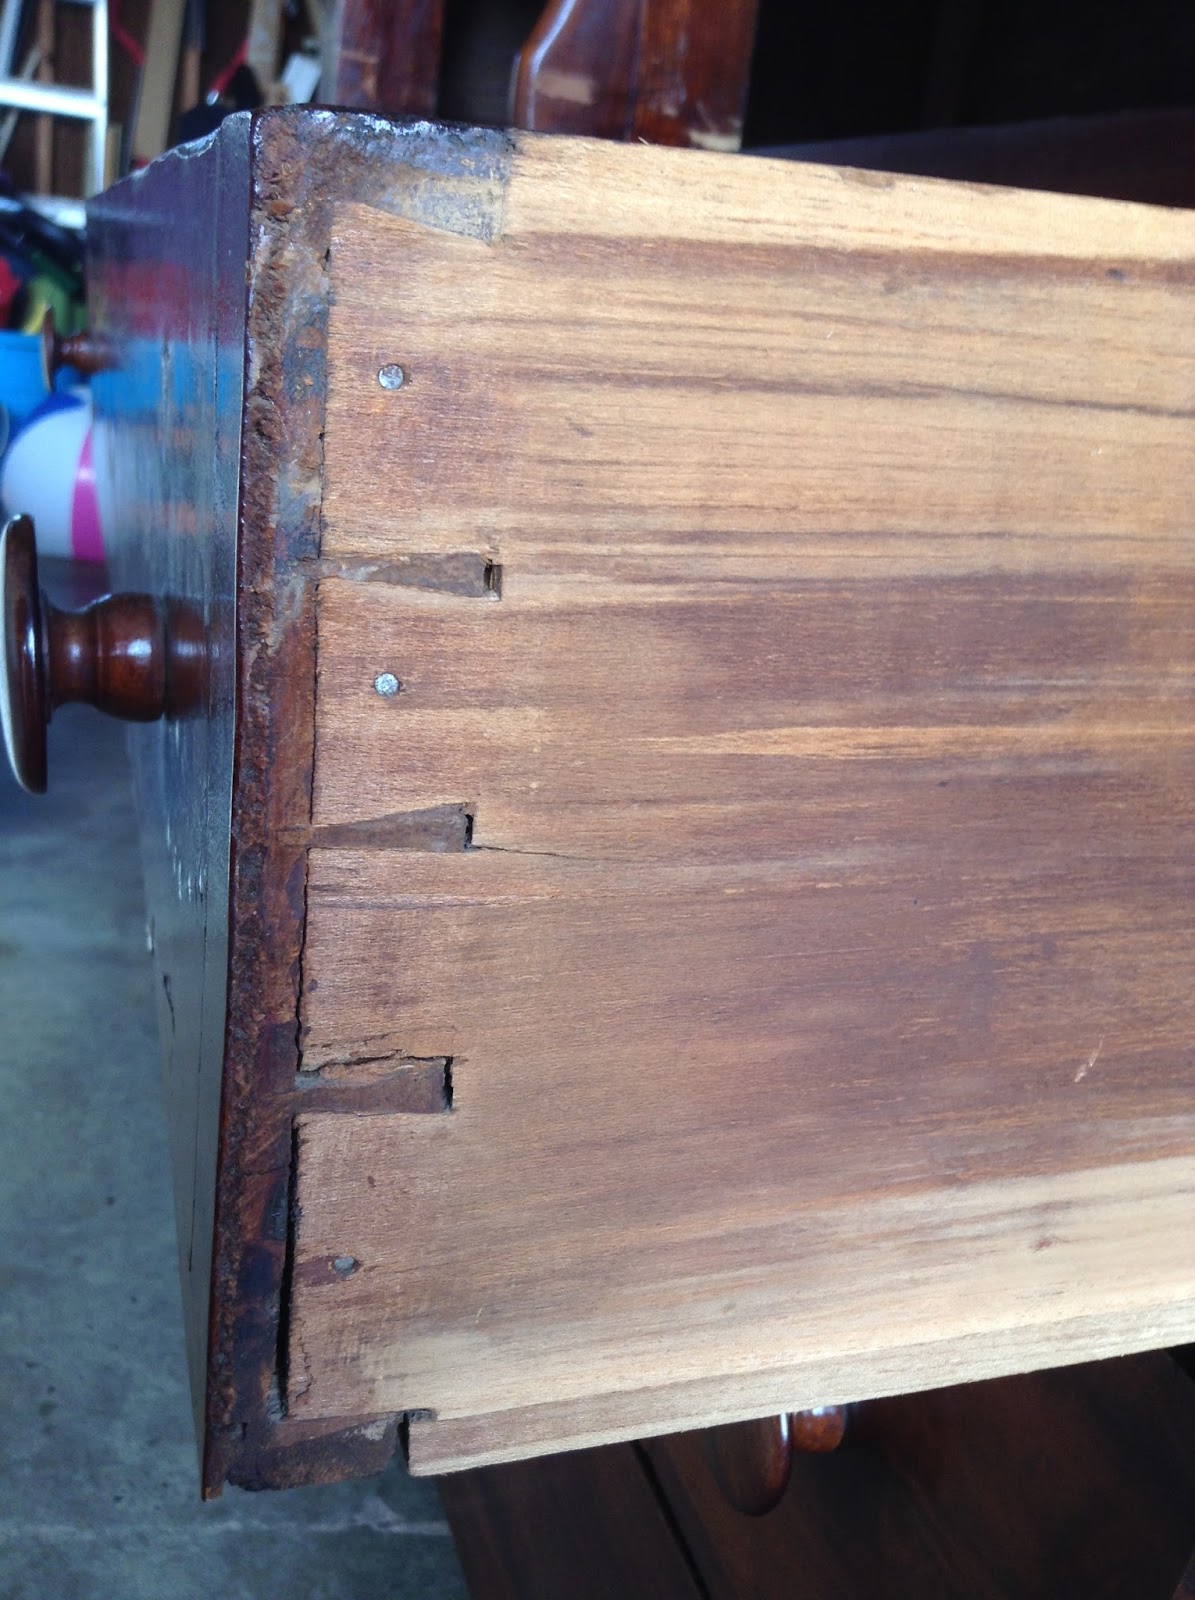
1.  Gorgeous, handmade dovetail drawers!  These were done without a factory.  Makes me think of Pa Ingalls working away in his workshop for his Half-Pint Laura.  To think they held together all these years!

Hand-carved dovetail drawers


Each drawer was unique
2. Hand-planed wood too!  The inside of the dresser revealed hand-planed wood.  Again, serious Amerian craftsmanship.

With the drawers removed, you could see the raw hand-planed wood


Yes, the back piece had started slipping a little after 150 years of gravity!
3. Drawer knobs that were all one piece!  The knobs and their "screw" were all one piece of wood.  When I unscrewed the knobs, the threaded end was part of the knob.  Therefore, in order to fix the missing two knobs, I instead glued on two new knob "faces" to the existing remained of the broken knobs.  That way as much of the original knob was salvaged. 

Notice the two knobs on the left of the bottom two drawers were missing and then reconstructed.
4. The dresser had character in the form of a crack.  Some might see a crack as a flaw, but this crack showed it's almost 150 years of use.  It was a battle scar from the post-Civil War era to our modern day technology age.  It stood the test of time and took a crack along the way.  Prior to it coming to me, someone had carefully secured the inside to keep the crack from growing.  I added the glass to make sure it didn't bow over time or crack more. 

The top as it came to me

The "anchor" on two sides from the inside to hold the crack in place
The top after much cleaning and oil

The top with glass added.  It's ready for a new home!
 
Of course, I did a lot to bring the shine back and oiled up each drawer, inside and out with lemon oil.  The dresser was so dry.  It was ready for a new home.  The dresser sold and went to home that will treasure it for many more years to come.

Look at those gorgeous curves!

What a beauty!


Wednesday, November 19, 2014

American Girl Doll Cabinet Makeover


When this vintage/antique cabinet that had been redone with a 1980s stenciled creation showed up for me to rescue, I fell in love with it immediately.  It was long overdue for a new overhaul and new purpose.  Upon removing the paint from the top, I quickly realized that the wood was not uniform around the cabinet and it would need be kept a painted piece rather than stained.  Having grown up with a dislike for dolls, and now being a mother of only boys, I laughed at the original suggestion of a doll cabinet from my neighbor.  However, this American Girl craze had me thinking.  Not only was thinking, "Thank God I have boys!" but that this would be the perfect height for a little girl's doll collection. 

So I primed and painted over the stencils.  Painted the whole cabinet white.  Then I traced out a plain star so not to fully copy the American Girl logo.  The rest was easy with filling in the star, putting a coat of seal for the paint and shining up the brass drawer pulls.  Did I mention the real brass pulls?  Under the years of tarnish were shiny brass pulls!  This is why I love working with other people's castaways.  They often don't know what they've thrown away. 

It didn't take much except some paint, fine motor skills, and elbow grease.  However, hopefully this Christmas a little girl will be surprised with a new cabinet for her American Girl Doll collection.


Sunday, November 16, 2014

End Table Checkerboard Fail and Redo


I had seen this great pin on Pinterest from Minwax about how you can stain a checkerboard right into the top of a table.  I was up for the challenge and purchased my $5 yard sale table to being the project.  However, when I sanded down the stain off the top, I found the wood to be a knotty pine that would never in a million years cooperate with a checker pattern.  With my luck the dark knots would end up right where the light squares should be.  So I moved on to plan B.

I had already purchased the Minwax Polyshades in Pecan for the first round of the checkerboard so I stained the top and drawer in this shade.  Three coats later, I liked the color and moved on to the legs.  The dark knots needed to be paired with a dark charcoal bottom.  The contrast is more than I would normally choose, but I liked the outcome.  I swapped out the dainty white knobs for small black ones and a new end table is born (without checkers).


Thursday, October 30, 2014

Salvaged Headboard becomes a new Coat Rack


"I see dead people" was a line from the movie, The Sixth Sense.  That's how I feel sometimes when I see a piece of discarded furniture.   Of course, I don't see dead people, but sometimes I look at it and see something that my family can't see.  In this case, I saw a headboard in my neighbor's trash that I just had to have because I saw a new coat rack.  My husband couldn't see it but he played along and helped me carry it to our deck where he sawed off the legs so we could store it for a "rainy day" when I had more time.  That time finally came this fall.

I got to work on sanding the rough spots, painting on the primer, then the gray paint.  Of course, I had to sand all my drips and start again.  Those circles in the center were not as easy to work with as I originally thought!
Add caption
Once I had the paint as I'd wanted, I tried to add an accent color to the indent in the circles but nothing seemed to work.  So I primed and painted again.  In the end, I found the starfish/stars for the corners as accent pieces and put on black hooks.  I thought maybe simple is better.  And the finished product is nothing like the original headboard!  I'd love to say I'm keeping this piece, but at 5 feet long, we don't have a mudroom or entryway large enough.  So it's been purchased by someone who can enjoy it in their home!
The finished product